Friday, January 28, 2011

Children's Wear Project

Last week I was updating my portfolio and did a new project for children's wear.  These are technical flats to show where essential elements will be placed and how they will be stitched down.  I also included a swatch page and color options to help visualize what the clothes will look like and their fabrication.


Doing this project really made me feel like I was back in college, but I think it is a great addition to my portfolio!  If you are interested, you can see my online portfolio at 

Wednesday, January 19, 2011

Happy Birthday Mom and Dad!

Today is a post just to say "Happy Birthday" to two very special people -
 yep, my Mom and Dad.
And before you ask, yes, they have the same birthday although are one year apart. 
 For this post I would like to share a couple photos to help tell their story.


Two of my favorites, my parents as teenagers :)
Vicki Lou Pope and David Gregg Dickson


Engagement Photo 1981

Wedding: October 16th, 1982


Precious Family 1995
Dad, Mom, Whitney, Brantley, and Bo


Still Rockin' the Stache!
1996


Mom and Dad 2009


Jamie, Gregg, Whitney, Vicki, and Brantley
May 15, 2010

My dad once shared this scripture with me and I find it appropriate to represent 
what God might say to them both on their special day.
And a voice came from heaven: “You are my Son (daughter), whom I love; 
with you I am well pleased.”

I love you both, happy birthday!


Monday, January 17, 2011

Unique Pin Cushions

Yep - it is official, I am just not a consistent blogger.  
I guess we will just have to take baby steps!
I want to share a fun project I did - handmade pin cushions.  


I have taken a salt shaker and filled it with vintage inspired materials such as old buttons, threads, and pearls.


Then, with batting, felt, and lace, I created a "cushion" to place on the top of the shaker.
This allows pins to be kept together while also having a piece of art that you can keep out even 
when you are not sewing!


I used a novelty lace to create more visual interest, but still allows the pins to be pushed through.


With this one, I used a bigger jar and filled it with an old photo, buttons, measuring tape,
and other unique items.


I used a embossed felt for the cushion and twine to secure it down.


Monday, January 3, 2011

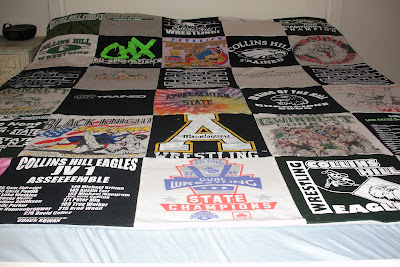
T-shirt Blanket

So - I have taken a couple weeks off for the holidays!  But now I am 
back with all my handmade gift from this season :)  I wanted to share a great, comfy, 
one-of-a-kind present I made for my brother in law. I made one of these 
for my husband a couple years ago,
 and I will tell you, it is our favorite couch blanket!  I don't have my 
process documented - but it is pretty simple: Start by taking any old 
shirts that have valuable memories or shirts you just couldn't bare to get rid 
of and cut them into 12x12 inch squares. 

 My husband and his brothers were and are wrestlers, so they have 
goo-gobs of t-shirts from tournaments, championships, and camps they 
attended. It made this blanket very cohesive. After cutting all the squares, 
I planned the layout, and began to sew each t-shirt square from left to right
 until I had 6 rows (using 1/4 to 1/2 inch seam allowance.)
 I continued this process by sewing each row together. To attach the
 back (I just used a thick fleece) I sewed the blanket like a big pillow. 
I put the two fabrics facing towards each other sewing along the outside 
edges, leaving enough 
space to flip the blanket inside-out and ta-da! 


The best part about this blanket is that you can change the number of rows 
and columns according to the amount of t-shirts you have, or the size of 
bed you may want to use it on.


This gift is not only warm and cozy, but always brings up memories every 
time you use it.


This is something that not only we get to enjoy, but hopefully one day we can use to 
tell stories to our kids.